
Step 11
The origin of the X value is set to 1.00. Change it to 0 and Calculate 3d again. You will notice the origin is now centered so the resulting fractal is more radially symmetrical.
Step 12
Go back to the Fo.2 tab and change the _PolyFolding order to 16 and Calculate 3d. The five sided sub shapes are now 16 sided.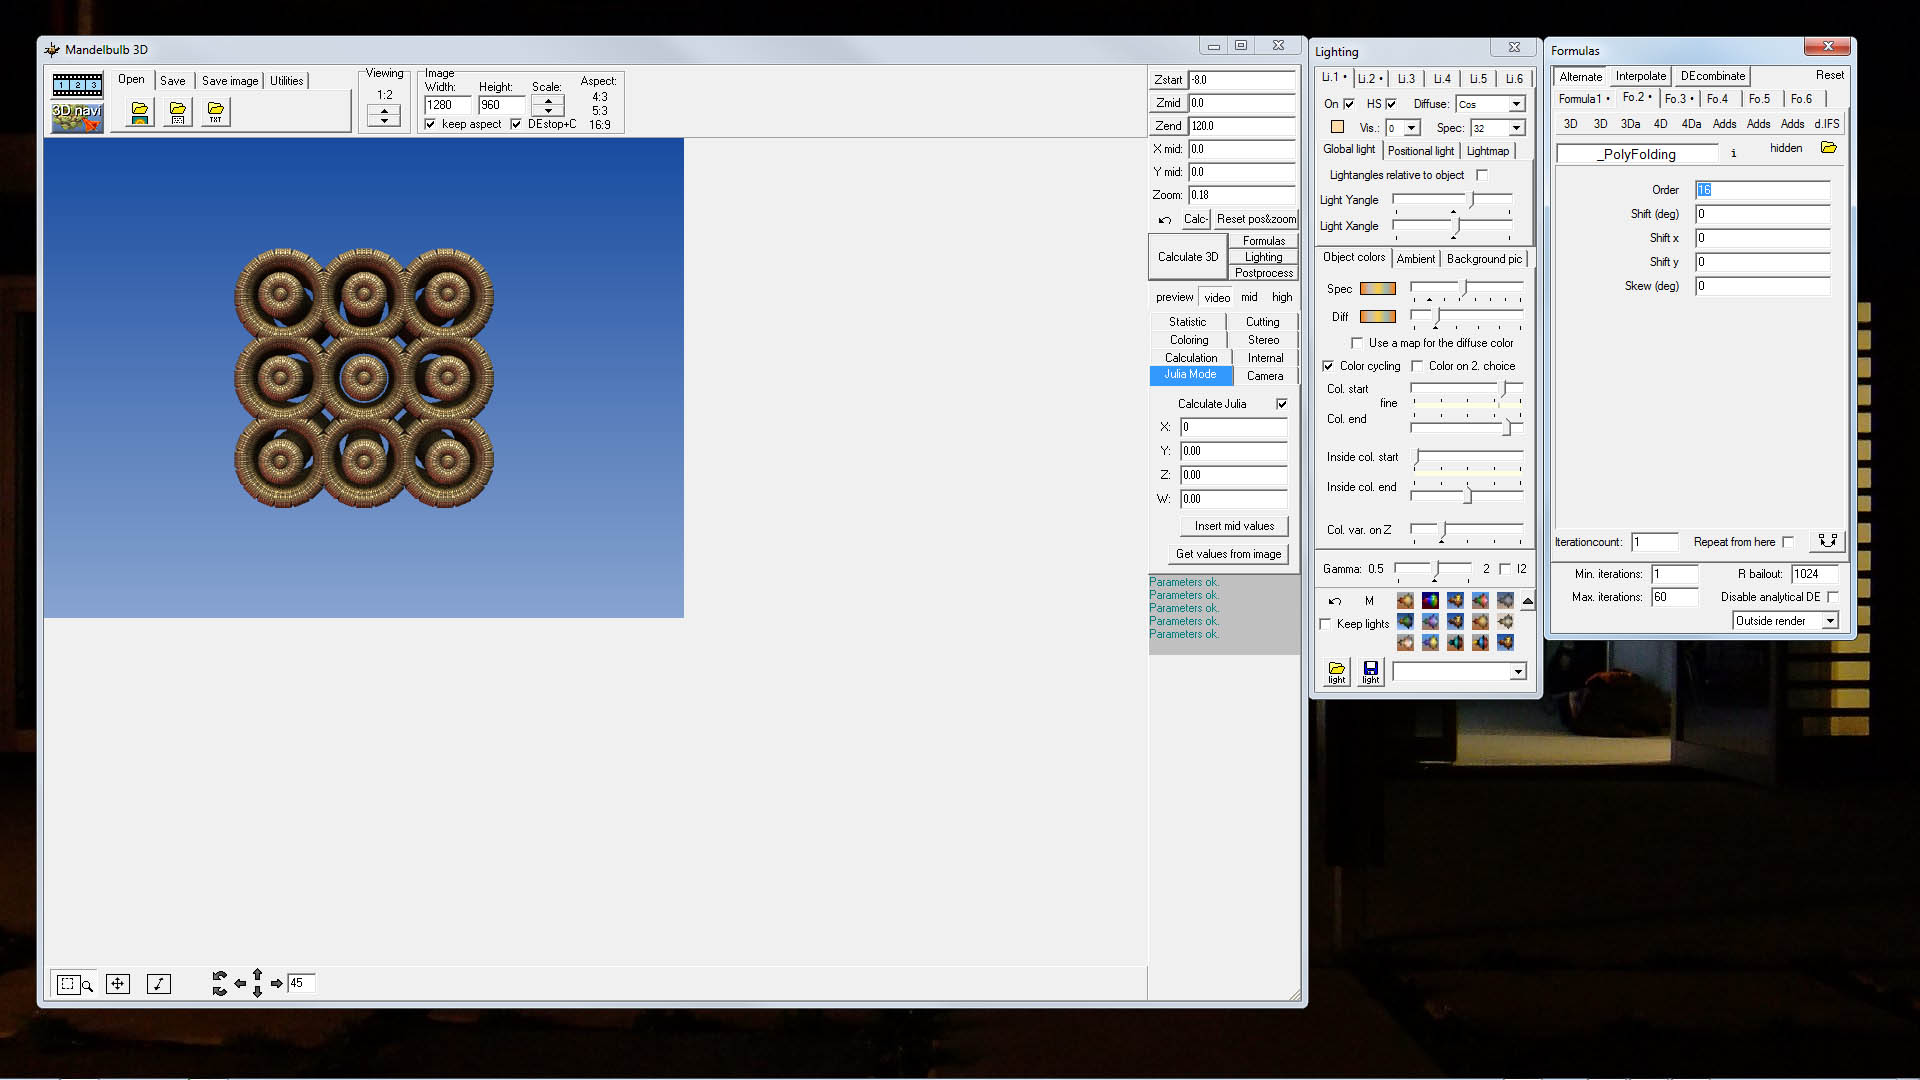
Step 13
There is no step 13
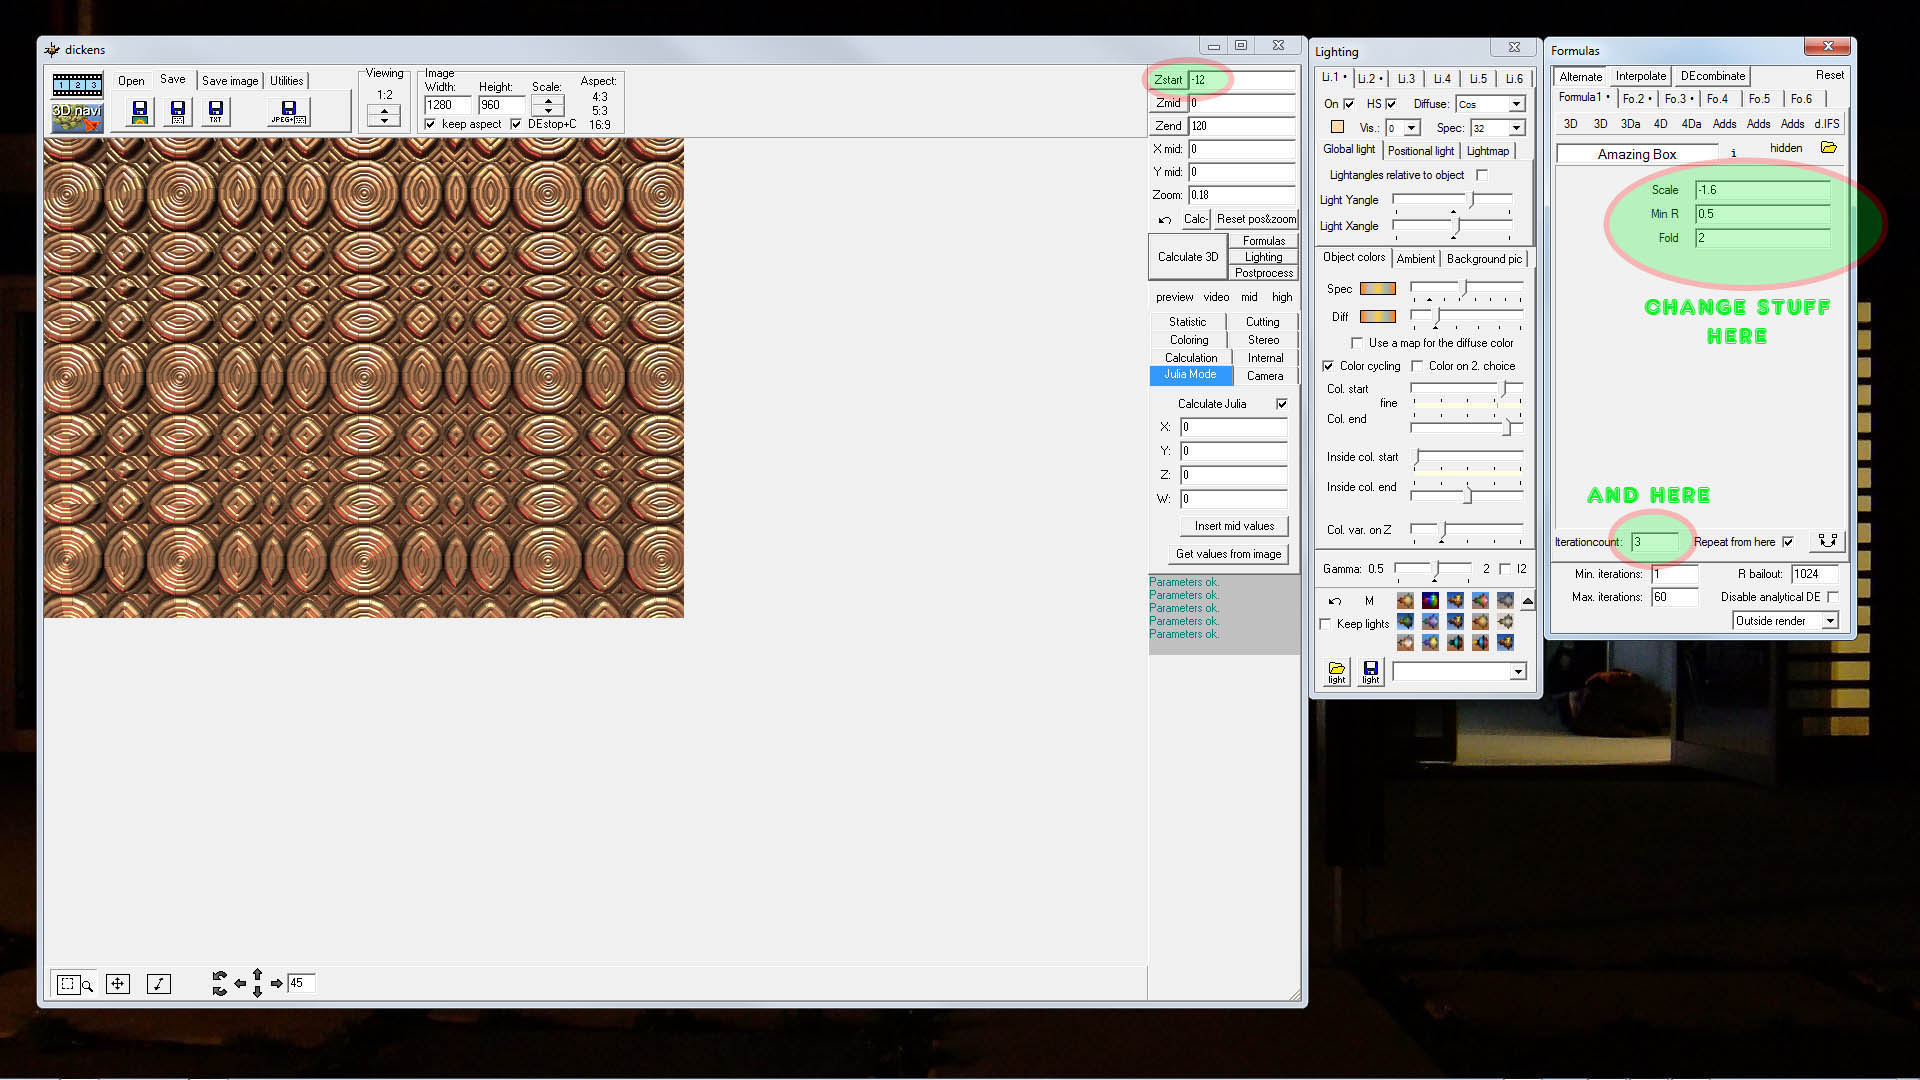
Step 14
Go back to the Formula1 tab. Change the scale of the Amazing Box (Mandelbox) to -1.6, the folding to 2 and the iteration count to 3.
If you calculate 3d now you'll see that we have intersected the fractal. Change the Zstart from -8 to -12 and calculate 3d again and jubilantly enjoy the progress towards order.
Folding 'folds' the manifold dimension of the fractal which not only sounds cool but makes Mandelboxes look cool too. Negative scale Mandelboxes look like broccoli or trees but in this example the MengerKochV2 somewhat negates the broccoli-ness. That's my hot tip. Neg scale Mandelboxes = winning.
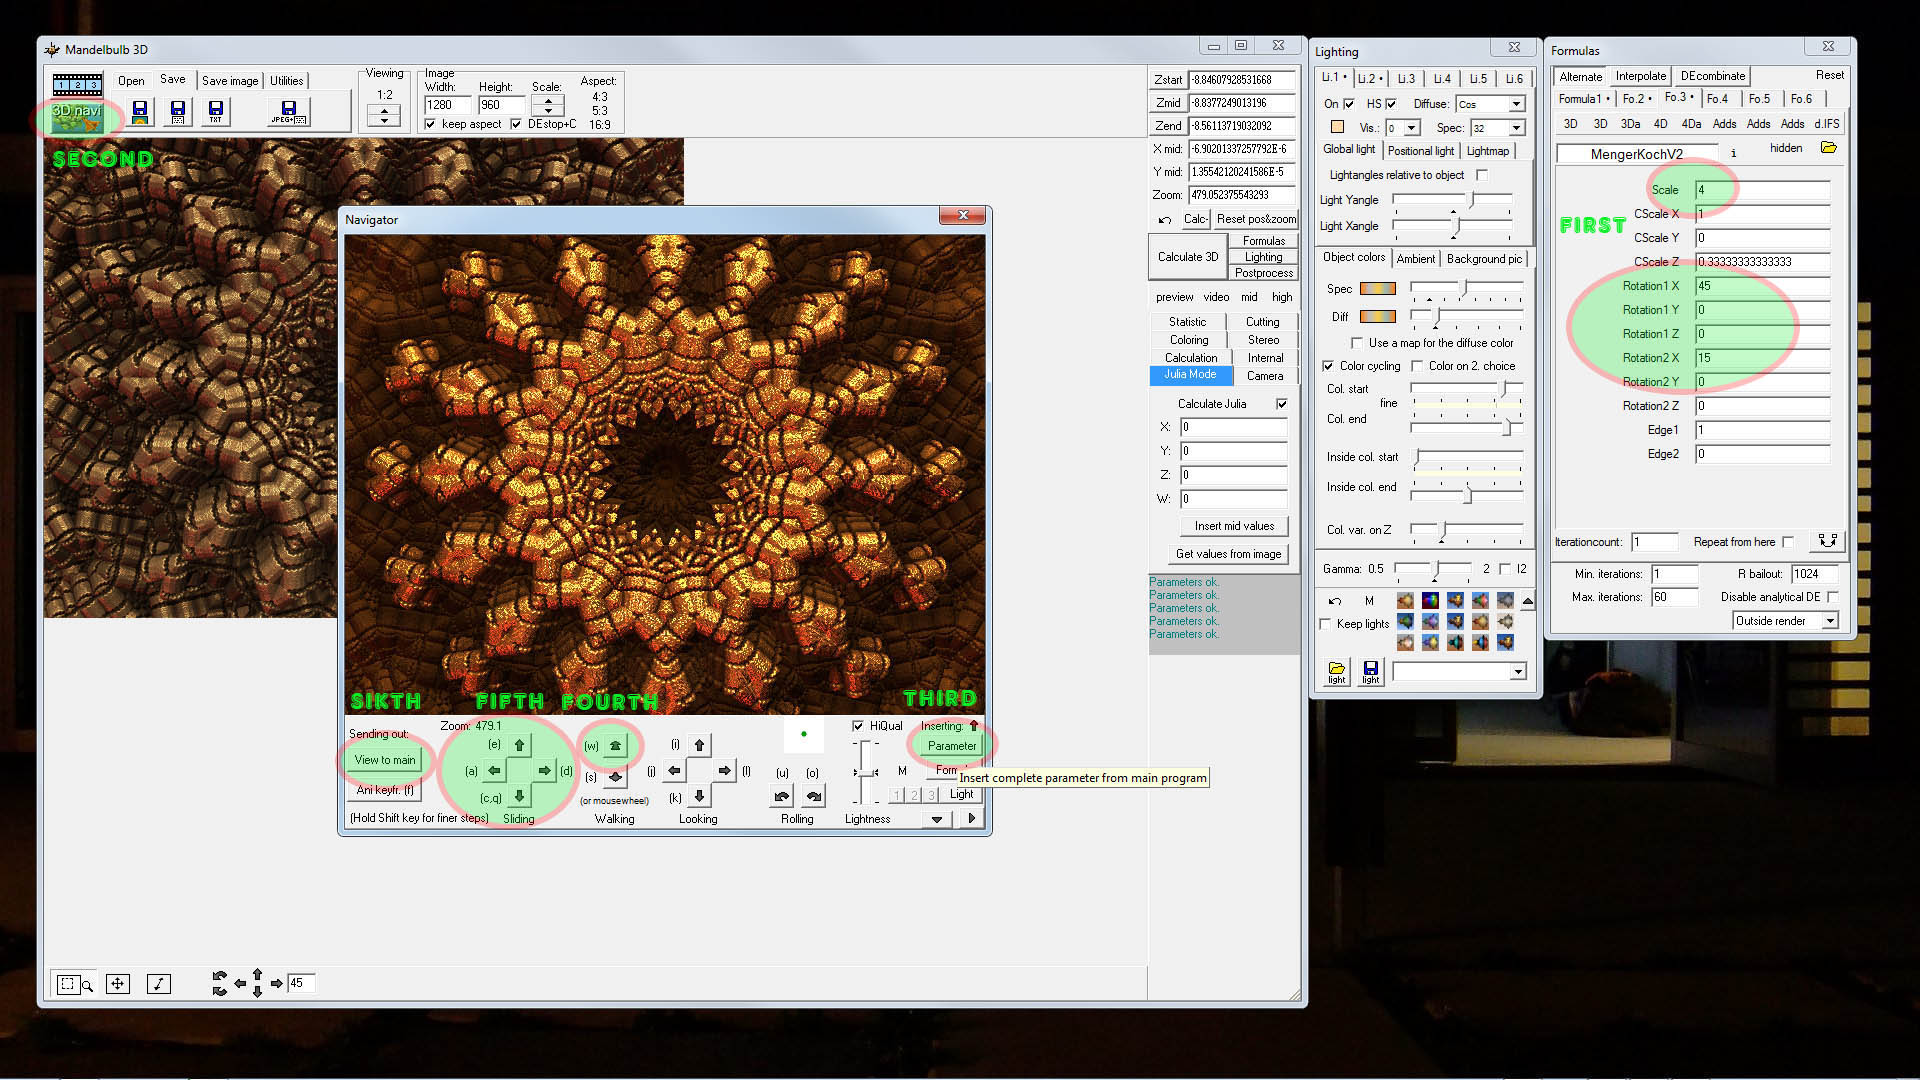
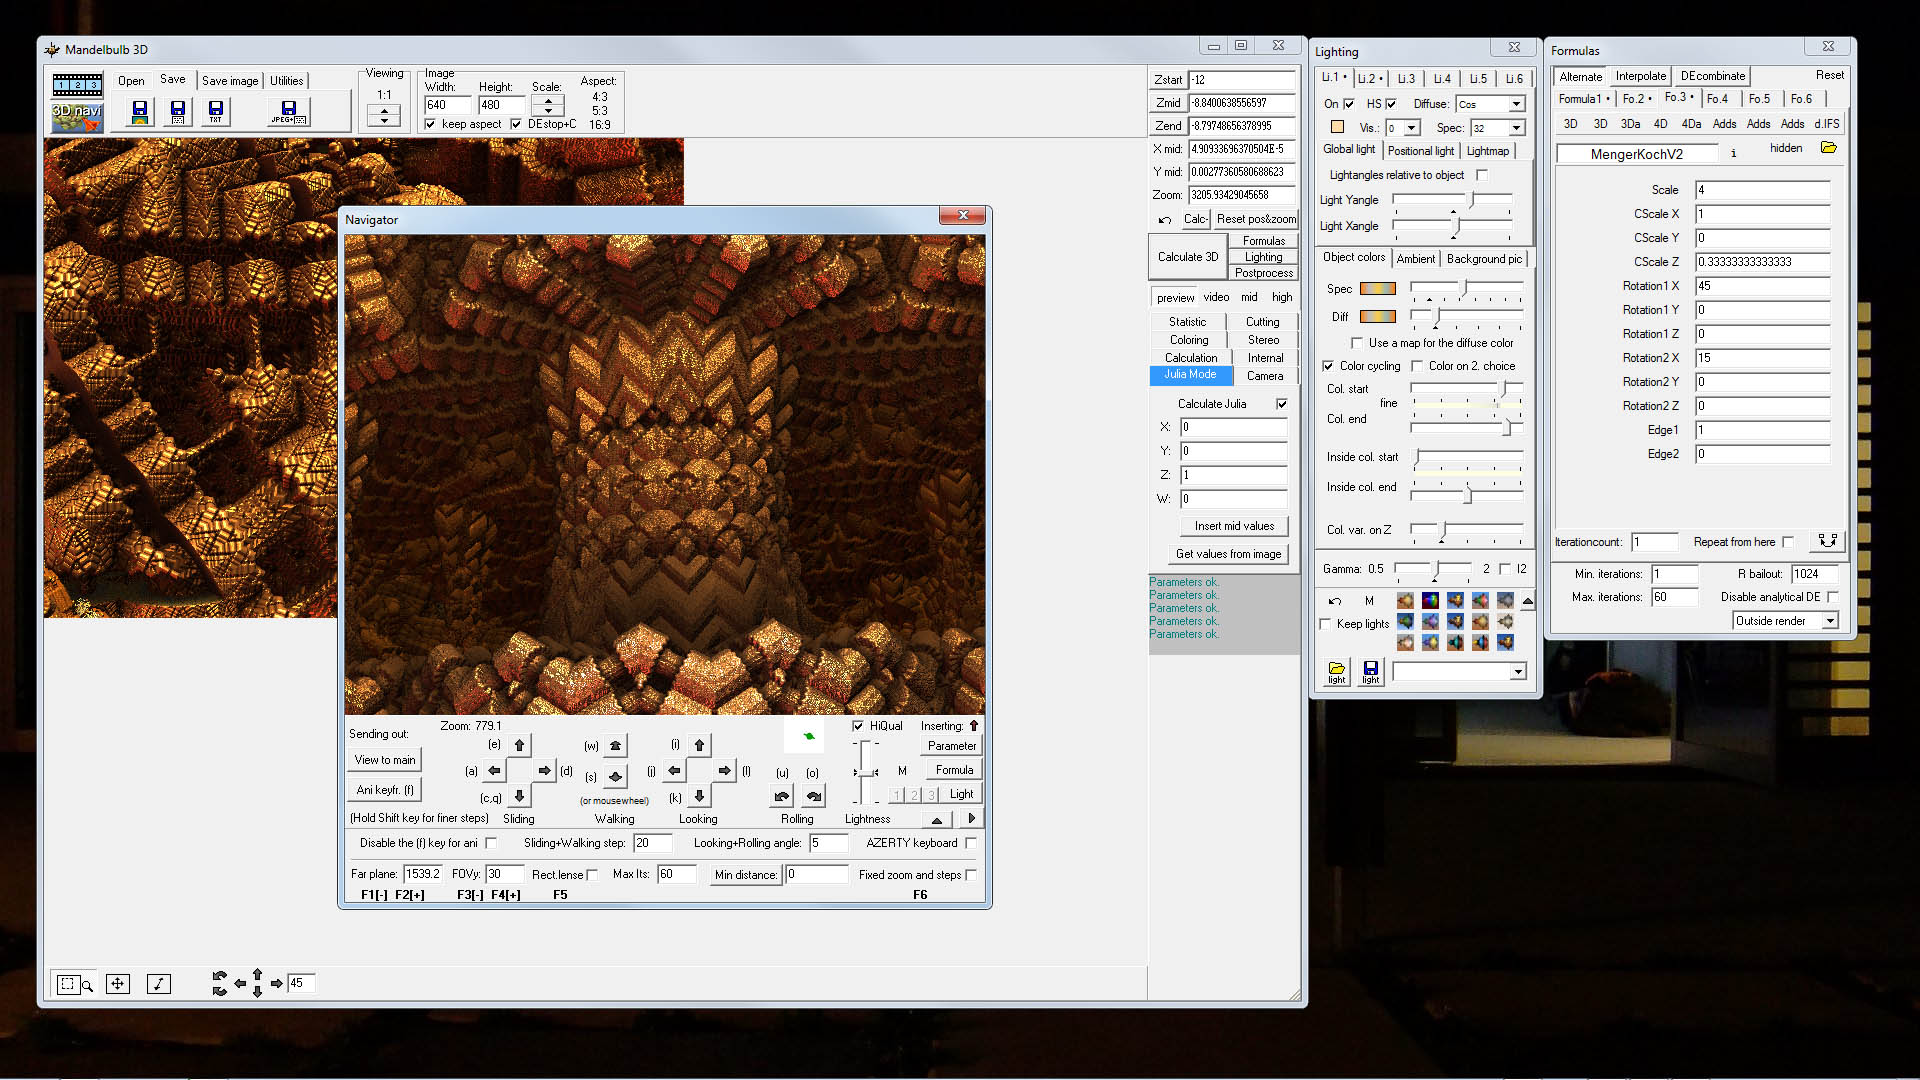
Step 15
First - In the Fo.3 tab change the scale of the MegerKochV2 to 4, change the Rotation1 X to 45 and the Rotation2 X to 15.
Calculate 3d again.
Second - Click the 3D navi button on the top left hand corner. Welcome to the interactive 3D navigation. Check the HiQual box if it isn't already checked.
Third - Click Parameter to load the formula from the main window into the 3D navigator, most times it will be there automatically but click it just to be sure.
Fourth - Move the mouse off the 3d navi window but don't click anything (if you don't move the mouse cursor away it will zoom into whatever is under the cursor). Press "W" until the zoom reaches 450 to 480.
Hold the shift key to make finer adjustments. You could hit the Walk forward button instead but that's a fair few clicks.
Fifth - Use the Sliding buttons (or the labelled keyboard shortcuts) to center the fractal in the view. Again hold the shift key while clicking for finer adjustments.
If you bork any of the above steps click "Parameter" and start again, it might take a couple of goes to get the hang of it and you might also want to go hog-wild exploring.
Sikth - Choose 'View to main' to return the view to the main window once it looks similar to my example. Remember, Parameter = fractal into the 3d navi. View to main = fractal out of the 3d navi.
Step 16
OK we've reached a way-point. Click calculate 3d. It looks nice. High five yourself. You could very well render this larger and use it. But it doesn't really look all that 3d yet so we'll change the angle of the view.
I haven't screen-shotted the next step properly so you're flying blind here. My bad.
Open the 3d Navi again and click parameter (just to be sure).
Press "c" 17 times.
Press "i" 12 times
Press "w" 30 times (or hold it down until the zoom reaches approx 2365)
Press "i" once
You may need to use shift+left sliding (shift + 'a') or shift+right sliding (shift + 'd') to make the view centered. YMMV.
Choose 'view to main' to return the parameters to the main window. Calculate 3d again and with a bit of luck it will look similar to my example.

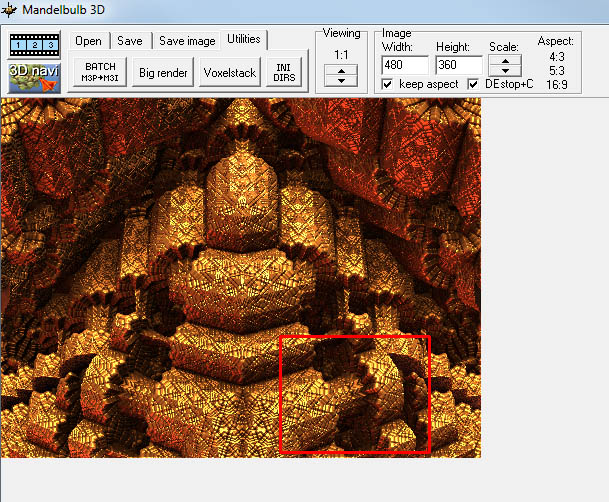
Step 17
Go to the Julia Mode tab and change the Z value to 1. Change the Zstart value to -12 or else you will see mongy bits if you calculate 3d.
Despite being careful when making this tutorial I have been unable to arrive at exactly the same result when checking if this tutorial works, but you should still be able to see what I will term the 'point of interest' as marked below. If it hasn't worked (due to deliberate or unintentional missing or changing of a step or most likely my bad) you will have to improvise from here on in. Yours will probably look closer to the second picture below.
Optionally, try entering the values below if you have no luck (hint copy paste). If that fails grab the catch-up parameters from the lifeline tab below.
Zstart -12
Zmid -8.8400638556597
Zend -8.79748656378995
X mid 4.90933696370504E-5
Y mid 0.00277360580688623
Zoom 3205.93429045658
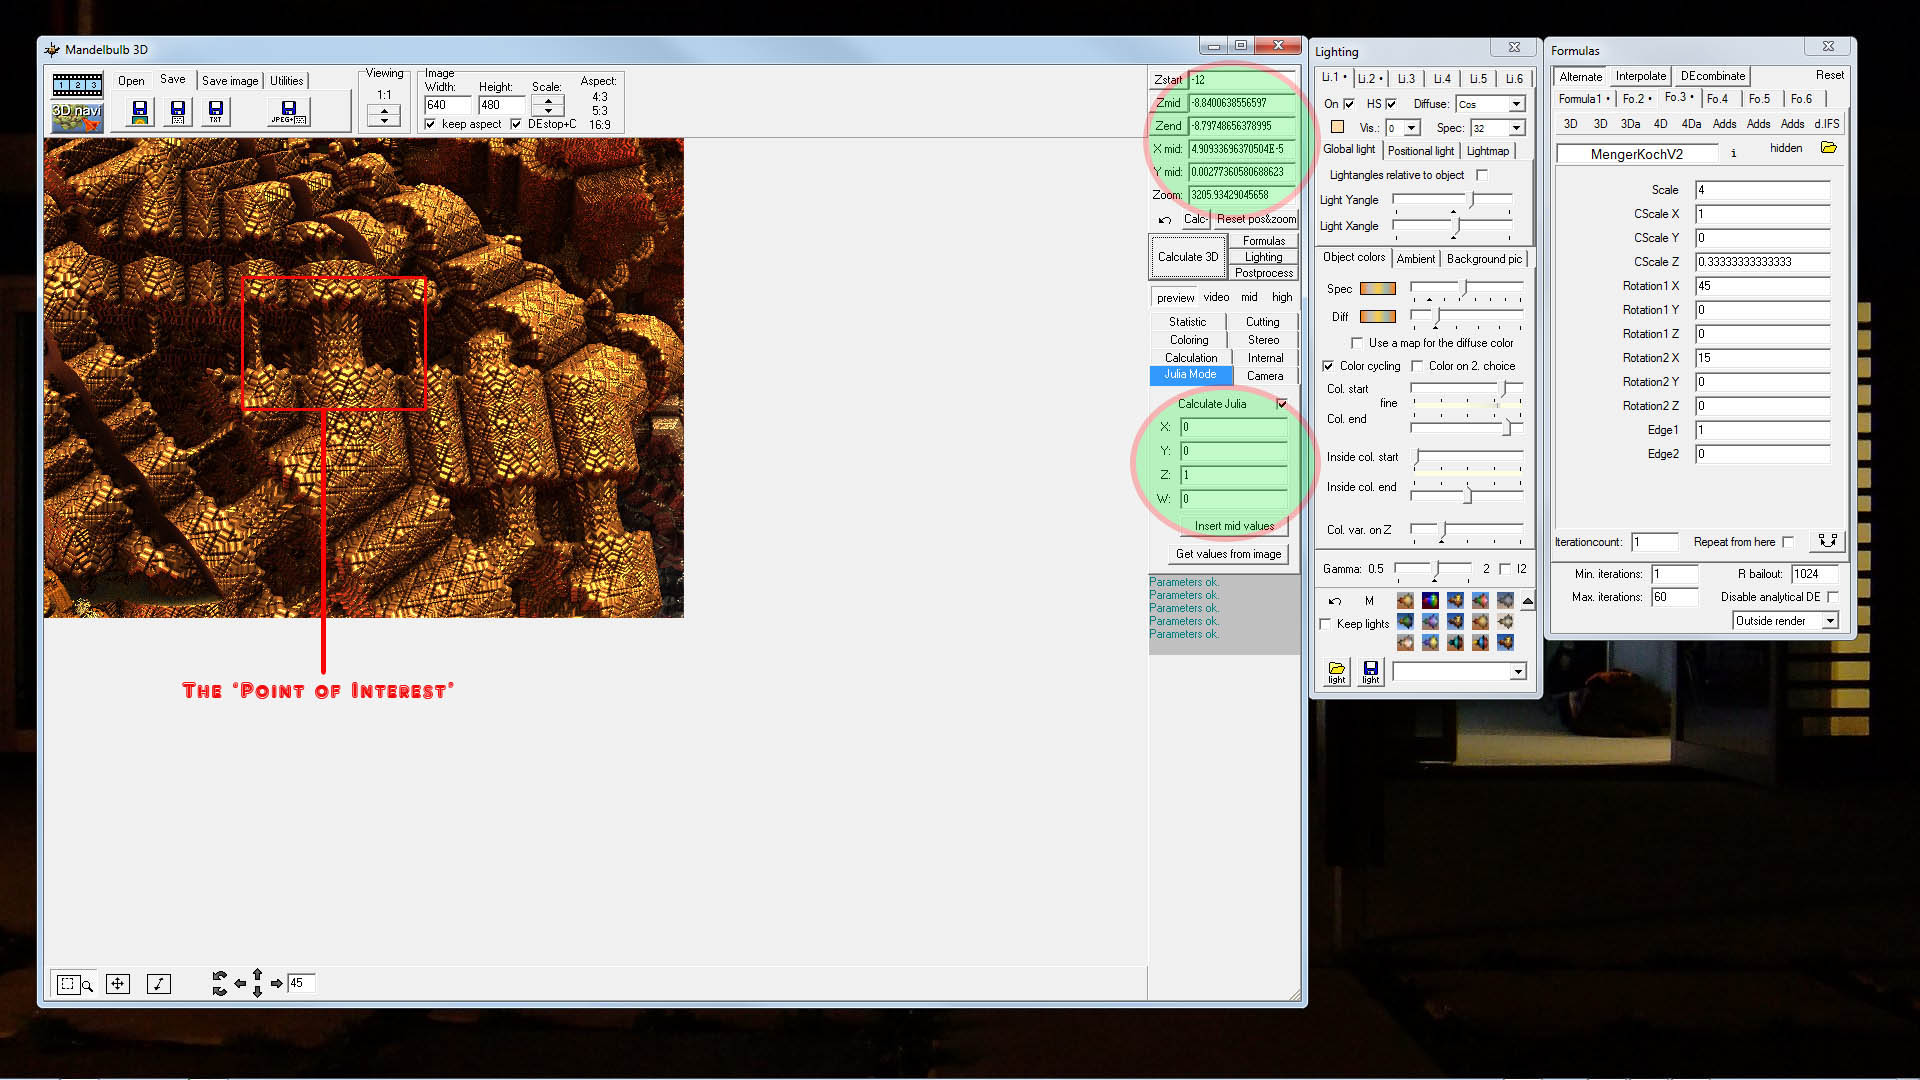
Yours will probably look like this one below. Obviously I changed something infinitesmally small to get the result above and forgot what I did, but the point of interest is still there so we're all good yeah?
Step 18
Go back to the 3d navi and use Parameter to bring the fractal into the navi.
Expand the lower portion of the navi window by using the arrow button on the right hand side of the lightness controls.
Change the rolling+looking angle to 60 and either press 'o' or click the right rolling button. Change the angle back to 5.
Now use either the
Sliding/Walking/Looking/Rolling controls or the wheel on your mouse to zoom in on the column. It might take a few goes to get it right. Press parameter to reload the fractal into the navi if you zoom off somewhere unintended and retry zooming in on the 'point of interest' which is a sort of column shaped section.

Once you have something similar to the example below, use 'view to main' to return it to the main window.
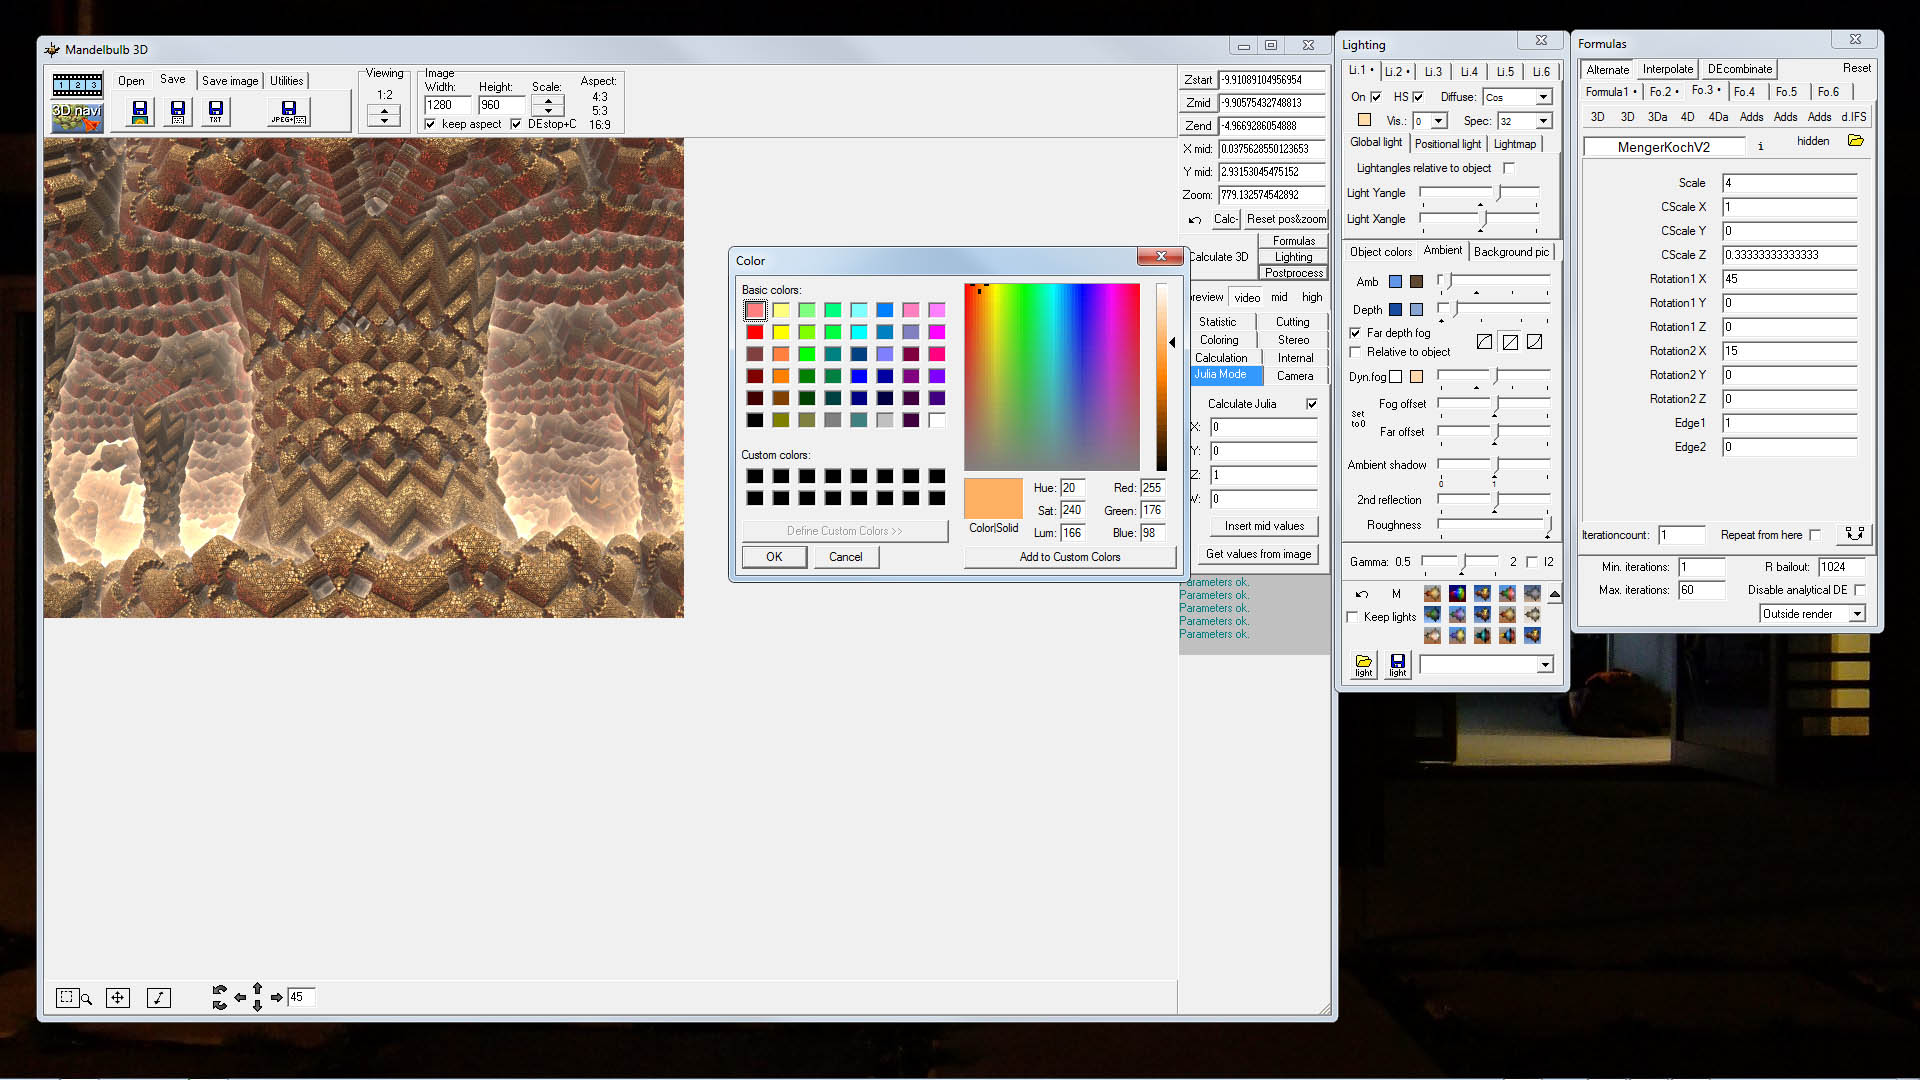
Step 19
Calculate 3d and go to the ambient tab on the lighting window. Use the Dyn. fog slider to add some fog. Change the second fog value to a light orange colour. Fog and Ambient Shadow are two of the important things you would change on pretty much every fractal.
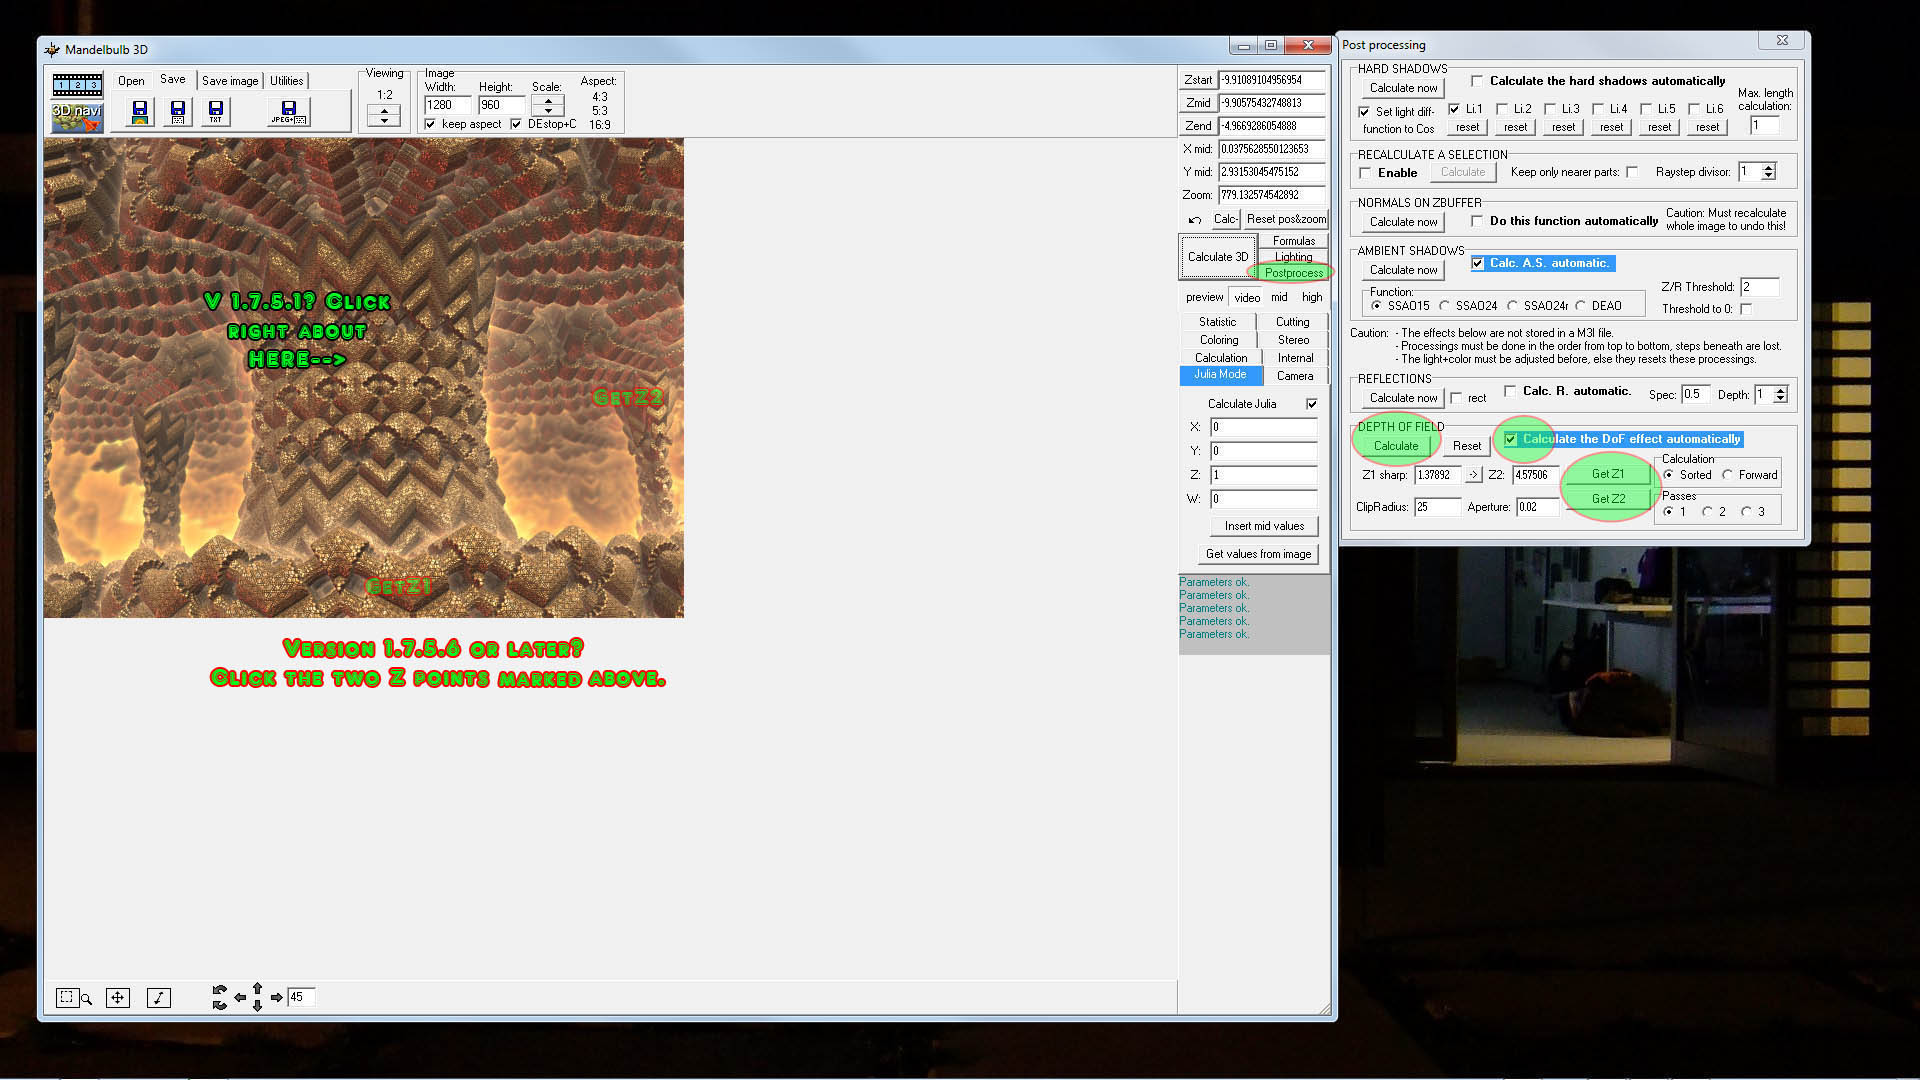
Step 20
Time to add some depth of field (DOF). Open the post process window (located next to the calculate 3d button).
Alright, the options changed between the version of M3D I told you to use and the version I used to make the tutorial (derp). But your task at hand here is easier than for newer versions. Click 'Get Z from image' in the depth of field section and click on the column. Check the 'Calculate the DOF effect automatically' checkbox and then Calculate 3d again. You can adjust the Aperture setting to control the strength of the DOF blur. Higher values = more blur. You can save a Z-Depth map and add DOF in Photoshop with the lens blur filter if that's more your style.
For M3D version 1.7.5.6 or later (as pictured below) mouseover here for instructions.
Click GetZ1 and click at the base of the column roughly where I have marked on the image below. This will define the front of the 'in focus' zone.
Click GetZ2 and click on one of the smaller columns or any other desired background point to set the far limit for the 'in focus' zone.
Check the 'Calculate Depth of Field automatically' box and either press calculate or just use the main calculate 3d button. You should have a nice DOF effect. Use the aperture setting to increase or decrease the DOF as desired. Higher values create stronger blurs.
Step 21
The 'preview', 'video', 'mid' and 'high' options under the calculate 3d button are rendering presets. So far we've been using the preview option but now we want to render to a larger size.
Choose 'mid' and calculate 3d. Now would be a good time to go and top up your hot beverage.
On the top toolbar you will see an option called 'viewing', this controls the scale of the picture on screen and how big it saves the render as. Click on the 1:2 or use the arrows to set it to 1:1. In general usage you would probably render twice as big as your intended size and save the 1:2 image which has antialiasing, but the post processing we'll do will mostly hide the aliasing so just save the 1:1 image.
Under the 'save image' tab in the main window save the image as a bmp, png or jpg, the choice is yours.
Congratulations you now have a 3d fractal! Remember to save your parameters in the save tab. When you quit M3D it save the last used parameters to the clipboard which is handy if you closed the program and realised you forgot to save.
Follow part three for a some post-processing tricks in Photoshop to make it look a bit more finished.
